photo home_zpsd143792f.png photo About_zpsce4e5ab7.png photo portfolio_zps5df6240e.png photo NavBar5Photos_zpsc8efe369.png photo contact_zps2ba4ac0e.png

Wednesday, October 31, 2012

What I {Heart} Wednesday #2


Photobucket
Happy Halloween!! 
In honor of this goulish holiday, here are so Halloweeny things I {heart}: 

I {heart} Halloween Treats for Class Parties 

These were simple and healthy! One container of peaches or mandarin oranges, one sharpie to draw the face on, one spoon to add to the mix, plastic wrap and some ribbon to dress it up! I also designed a quick tag to go with it!

Photobucket

I {heart} Fabric Mod Podge 
It made making Mylah's costume a BREEZE! It's am awesome product. Wish I'd thought of it! 
 
Photobucket

Photobucket

I {heart} Green Monster Slime 
 I was totally going to do this for my kids classes, but time got the best of me, I ran out of it, so I did the peaches instead. :) Check out the tutorial HERE.


I {heart} this Kip Costume
 I wish I had a little boy, that size, with that length of hair...he would SO be Kip!
 Dallin is a little old, and a little on the tan Hawaiian side to pull this off!

costume

What's are you {heart}ing today?! 

Hurry quick, link up your Halloween favorites, or anything you are {heart}ting today!
Linky party starts NOW! 


Tuesday, October 30, 2012

Tutorial Tuesday - Scrap Fabric Skirt

Photobucket
This week I have been super busy sewing gowns for my shop - The Mended Heart. It has made for delays here on this sweet little blog of mine. I apologize! Last week I did really well prepping posts the night before! But add busy shop orders to Halloween festivities and you get one busy Mama! 

Today's tutorial is easy and one I wanted to share because these skirts literally took me less than an hour to make! I wanted my girls to have something to wear to church that wasn't spooky Halloweeny but cute Halloweeny...the scrap fabric skirt was my solution!

Photobucket

Here's the tutorial:
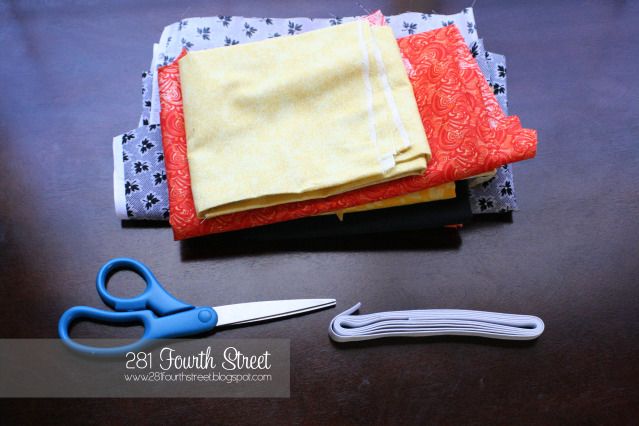
Supplies needed:
- Elastic
- Scissors
- Scrap Fabric
- Sewing machine (not pictured)

Photobucket

Step 1) First you need to measure your daughter's waist to see how big the skirt will need to be. This will be how much elastic you need to cut. Don't worry about leaving extra to sew the elastic together, these skirts make it stretch out a little, so you may need to measure just an inch or two under what her waist size is.

(Sorry I don't have photos for this step or the next. I decided to do this tutorial after I had made the skirts.)

Step 2) Next, sew the ends of your elastic together to form a circle. I used a zig zag stitch on my machine and just back stitched about an inch and then stitched and back stitched again. I find this to secure it well.

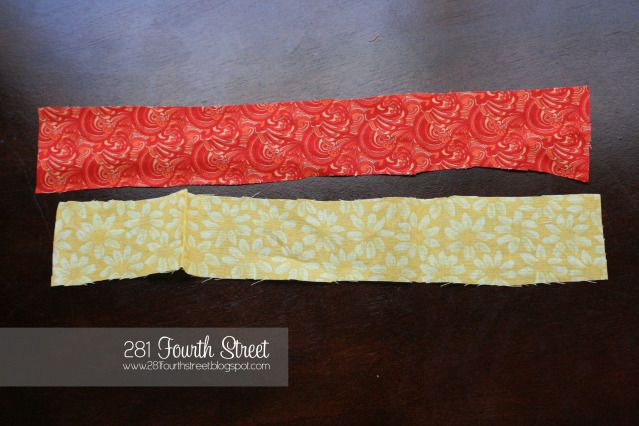
Step 3) Now you need to cut your fabric into strips. For my three year old's skirt I cut them 3 inches wide by 20 inches long. Remember, you will be folding these in half to tie around the elastic, it will make them shorter than what you cut. For my 1 year old I did 3 inches wide by 12 inches long. You decide what length you want them to be.The best part about this step is you don't have to cut perfect, that's what makes them unique! I also angled some of the strips to add variety to the skirt. Have fun, and be creative!

Photobucket

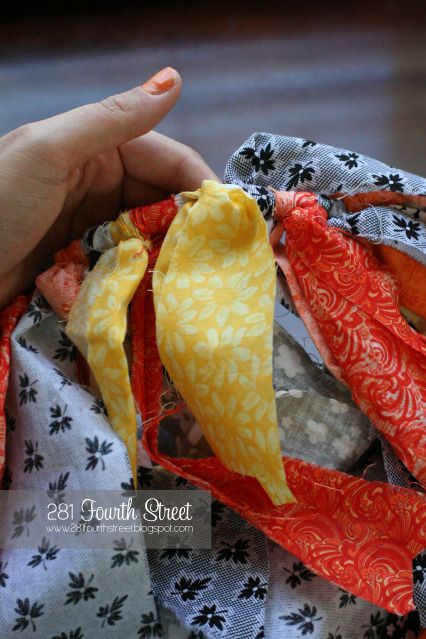
Step 4) Now take your elastic and put a strip of fabric behind it.

Photobucket

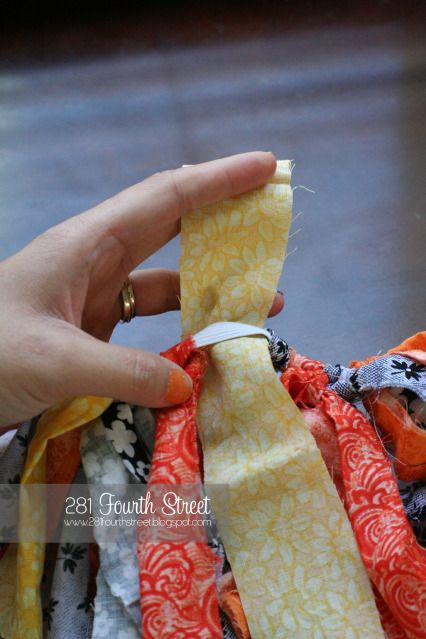
Step 5) Next tie the fabric strip into a knot. I did double knots for Rylee's (my 3 year old) skirt and ended up not wanting to do them when I got to Mylah's. You can do either, I think single knots hold just fine. 

Photobucket

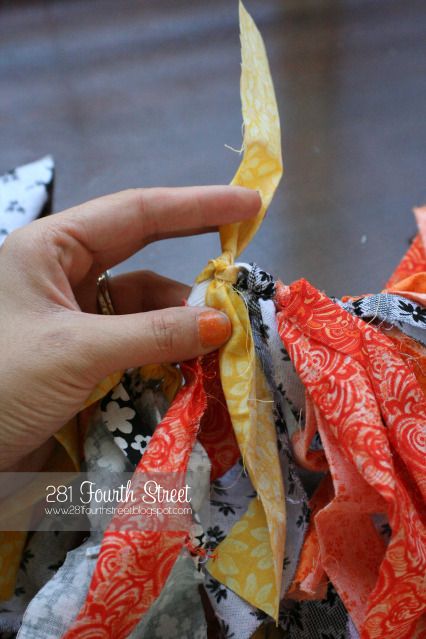
Step 6) Adjust the fabric strip to your liking and then repeat Step 5. Once you have gone all the way around your elastic, you've finish your skirt!

Photobucket

Photobucket

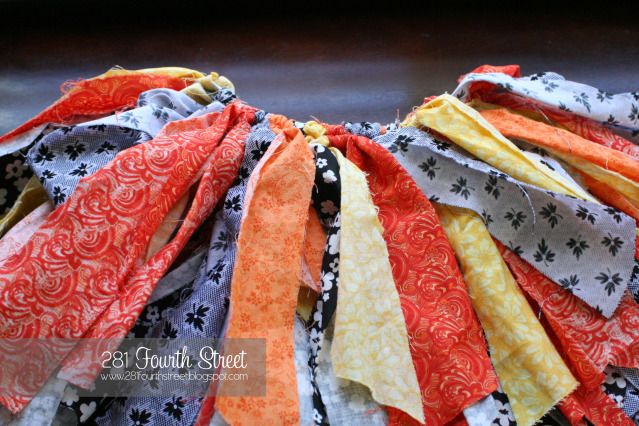
I hope this tutorial is useful, I paired Rylee's skirt with a cute cardigan, some black tights, and some black boots. It's such a versatile skirt and super cute with most everything!
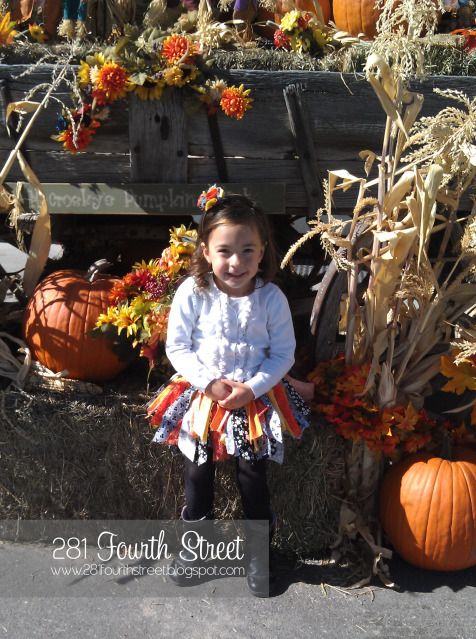
 She received many compliments on her skirt!

Here's my princess in her outfit! And though she appears to be squatting or something, she's not, she's sitting on the hay bale. It turned out to be a weird shot and is from my phone. :/

Photobucket

Good luck and as always, if you have questions, email me! 
Have an awesome day!


Photobucket

Monday, October 29, 2012

Make It Monday - Chile Verde


Photobucket
My brother in law is Hispanic. He's quite the character and always keeps our family laughing and smiling. We just love him, and he's an awesome father and wonderful husband to my sister in law Lindsay. He also cooks some amazing authentic Mexican food! He shared this recipe with Mr. H and I a few years ago and we have it every once in a while. I added a few things to it, but this is pretty much his recipe. Last night we dined on this pot of deliciousness, complete with rice and tortillas. I hope you try it out and enjoy it as much as we do here at the H house!


Pork Chile Verde

1 large Pork Roast, trimmed and diced
2 tsp. salt
1 tsp. pepper
1 med. onion, diced
2 cloves of garlic, minced 
1 can of diced green chilies
1 bottle of Herdez Salsa Verde
1 large can of Green enchilada Sauce
1 Tbs. dried oregano
2 tsp. ground cumin
1 cup of cold water
1/2 c. all purpose flour

In large pot heat oil and brown pork. 
Remove pork from pan and add onion and garlic. Cook for 2 minutes. 
Add green chilies and cook 2 minutes more. 
Once flavors are blended, add salsa verde, enchilada sauce, oregano and cumin.
Add pork back in to mixture.
Let simmer on low for 2-4 hours. 
About 30 minutes before serving, mix cold water with flour. 
Pour into simmer pot to thicken the sauce.
Serve with rice, beans and fresh homemade tortillas.
Enjoy!


Print Friendly and PDF

Friday, October 26, 2012

Frugal Friday - Be Prepared!


Photobucket
Did you miss me yesterday?! I apologize for not posting, I had a long day!

Mr. H and I went into the city to take our kids to see Hotel Transylvania. We were shopping at Walmart and all of the sudden the power went out and we were all asked to hurry and leave before their backup generators ran out of power.

We left only to find that the whole city lost power. THE WHOLE CITY!! We couldn't eat anywhere, get gas, finish our shop, let alone go to a movie! It really had us thinking about what we would do if this happened in our small town.

My short but sweet message to you today is this...BE PREPARED. As a member of The Church of Jesus Christ of Latter-day Saints, we are taught Emergency Preparedness and how to become self reliant. It is one of the things I appreciate most about my religion. Thankfully, because of that, I have begun our little family's plan to prepare for teh worst. And I have pinned numerous ideas on my Pinterest board because of it! Here are just a few frugal ideas to get you started:


There are many more prepardness ideas out there, on Pinterest, and the even the LDS church has a self reliance website called Provident Living. Visit them, learn more, be prepared! 
Happy Friday everyone!

Wednesday, October 24, 2012

What I {heart} Wednesday #1


Photobucket
Notice anything different?! I changed my Wednesday posts to What I {heart} Wednesdays. 
It will be a list of things I am loving for the week! It's also going to be a linky party! Will you join me?!! Here's my list of loves for this week: 

I {heart} spending time with this cute girl for an hour and a half everyday while her siblings are at school! 


I {heart} my hubby and all the hard work he is putting into our office remodel. Today he got the ceiling speakers up and running. Can't wait to rock out while I work! :)


I {heart} this amazing idea from Pinterest for a school organization wall. I plan to do this after we finish or office! I can't wait!


I {heart} the Fall's cooler weather and playing in the leaves!


I {heart} these delicious looking healthy "candy corn" style parfaits. Thanks Pinterest!


What are you {heart}ing this week?

Post your links!! I'd love to make some new bloggy friends, wouldn't you?

Linking up with:
What I am Loving

3 Four and Under


Photobucket
Wow Wow Wednesday with This Girls Life
 

Tuesday, October 23, 2012

Tutorial Tuesday - Ribbon Wrapped Pearl Bracelet

 
Photobucket
I am sooo excited to bring this tutorial to you today! So here's the back story...we are having our family pictures done tomorrow (squeal! I love family pics!) and I needed a bracelet to go with my outfit. So, why not make one? I had seen all those cute ribbon and pearl bracelets, but wanted something different.
I bring you, the Ribbon Wrapped Pearl Bracelet!

 There are tons of possibilities here, different beads, different ribbon, you name or think of it and it's possible! Here's the tutorial, good luck! And feel free to email photos of our bracelets!
 
Photobucket

Here's your supply list:
- A string of faux pearls (I got mine for $1)
- Needle and thread
- Any type of ribbon, measured to your wrist, then doubled
- Scissors (not pictured)
 
Photobucket

Step 1: Take your ribbon and fold it exactly in half. Tie a knot at the middle creating a small loop.

Photobucket

Step 2: Take your threaded needle and put it through the middle of your knot.

Photobucket

Step 3: Now take and string a pearl onto your needle and thread. Move it all the way down to the knot at the end of your bracelet.
Photobucket

Step 4: This is where it might get tricky, take your ribbon and bring it to the top of your pearl where the hole is. Make a mental note of where it lines up and then take your needle and thread the ribbon on top of the pearl.

Photobucket

Step 5: Now take the other side of ribbon and put it over the first piece. Make a mental note again and then take the needle and put it through the second piece of ribbon.

Photobucket

It should now look like this: 

Photobucket

Step 6: Repeat steps 4 and 5 until you have strung and wrapped all your pearl.

Photobucket

Step 7: Now that you are finished with the bracelet. Make a triple knot in the end of your thread right after the last ribbon.

Photobucket

I also tied a double knot with the ribbon after the threaded knot. It will help keep it secure. 
And there you have it - your brand new ribbon wrapped pearl bracelet! 

Photobucket

Email me with any questions and send any completed bracelet pics! I'd love to see what you come up with! Happy Tuesday everyone!

Monday, October 22, 2012

Make It Monday - Homemade Hot Chocolate

 
Photobucket
I must have a thing for warm, homemade drinks. This is my favorite time of year and I am pretty sure I have either cocoa or cider every night, while watching my evening shows. So here's another delicious warmed drink recipe for you!

I found this recipe online, added some yummy-ness of my own to it and now I am sharing it with you! It's perfect for gifts and any fall or winter holiday. You could also mix it up and try some other flavors. Experiment see what you can create! Enjoy the recipe!


 (Image courtesy of Google)

Homemade Hot Cocoa

3 cups dry milk powder
2 cups powdered sugar
1 1/2 c. cocoa
1/4 tsp. salt
1 tsp. vanilla powder
(I use Alison's Pantry brand)

Mix all ingredients together. Add two large heaping spoonfuls to 1 cup hot water or milk. 
Top with marshmallows or whipped cream. Store in air tight container. 

Print Friendly and PDF


And lastly, to add to the wonderfulness of this time of year, I designed some FREE Halloween lunch printables! There are some jokes and some blank cards to write notes to your kids. The cards are 3x2 perfect for little lunches. I had fun creating them. I hope you can get some good use out of them in the next couple weeks. Happy Monday everyone!


 (Right Click on the image to save and print)

Saturday, October 20, 2012

Saturday Post

Hey everyone! I apologize for my lack of posting yesterday. Things around here have been nuts! Along with all of my wifely/motherly duties, I am also an Etsy shop owner (See it HERE) and have been busy sewing and getting orders out! It's been quite the week for me! On top of that I decided to can Spaghetti sauce with the mountains of tomatoes we are still getting from our garden! Needless to say, I forgot to post yesterday. 

I am super excited for next week, I have a yummy recipe to share, an awesome tutorial and other fun ideas. I am also working on my youngest daughter's Halloween costume and will post that tutorial randomly next week!

Sidenote: I would love to gain more readers and am hoping to do a really fun giveaway soon! The last one was a success, but I still need more readers! Spread the word, share my blog and come back soon for foodie/crafty/inspiring goodness! 

Lastly, do you want to be a sponsor? Do you want to share your blog with my readers? Email me! I am doing Sponsor swaps until the end of the year! Next year beginning in January I will host an amazing deal for 6 months! Stay tuned to hear what it is! :)

Have a wonderful weekend everyone!


  Photobucket

Thursday, October 18, 2012

Thoughtful Thursday

 
Photobucket
Today flew by, I am so sorry that I am posting late! I am slammed this week with orders from my shop and busy with wifely/mommy duties! I apologize. 

Today's post is an article that my sister in law shared with me. I loved it. It talks about taking pictures with your children, not just of them. Help them to remember that you were there in every moment of their lives. As Mothers we are usually the ones caring for them, there for each milestone and spend most waking hours with them. This article was a wonderful reminder to capture those moments with your children. I loved it! Read the article HERE

Also, in other news...I am working daily on new card designs for my shop! Have you noticed it on my sidebar? If not,check out the 281 Fourth Street Shop HERE!  

Photobucket
Happy Thursday evening everyone! 
 
 
Photobucket